从 Remix 看未来的 Web 开发模式
date
Dec 8, 2021
slug
remix-run
status
Published
tags
React
Node.js
Serverless
summary
本文主要面向前端、全栈开发者,介绍下 Remix 是什么?为什么受关注?为什么(可能)是未来的 Web 开发模式?以及一些框架细节。
type
Post
本文主要面向前端、全栈开发者,介绍下 Remix 是什么?为什么受关注?为什么(可能)是未来的 Web 开发模式?以及一些框架细节。
一、引言(Introduction)
Web 开发一直以来将提升用户体验(UX)和开发者体验(DX)作为其核心目标。马上 2022 年了,现有的工具未能很好的解决,主要痛点有:

- 对用户而言,过长的白屏等待时间,首屏对用户、爬虫SEO都不友好。

长期以来,这些问题并不能很好地解决,直到看到 Remix,眼前一亮!

二、介绍(What's Remix)
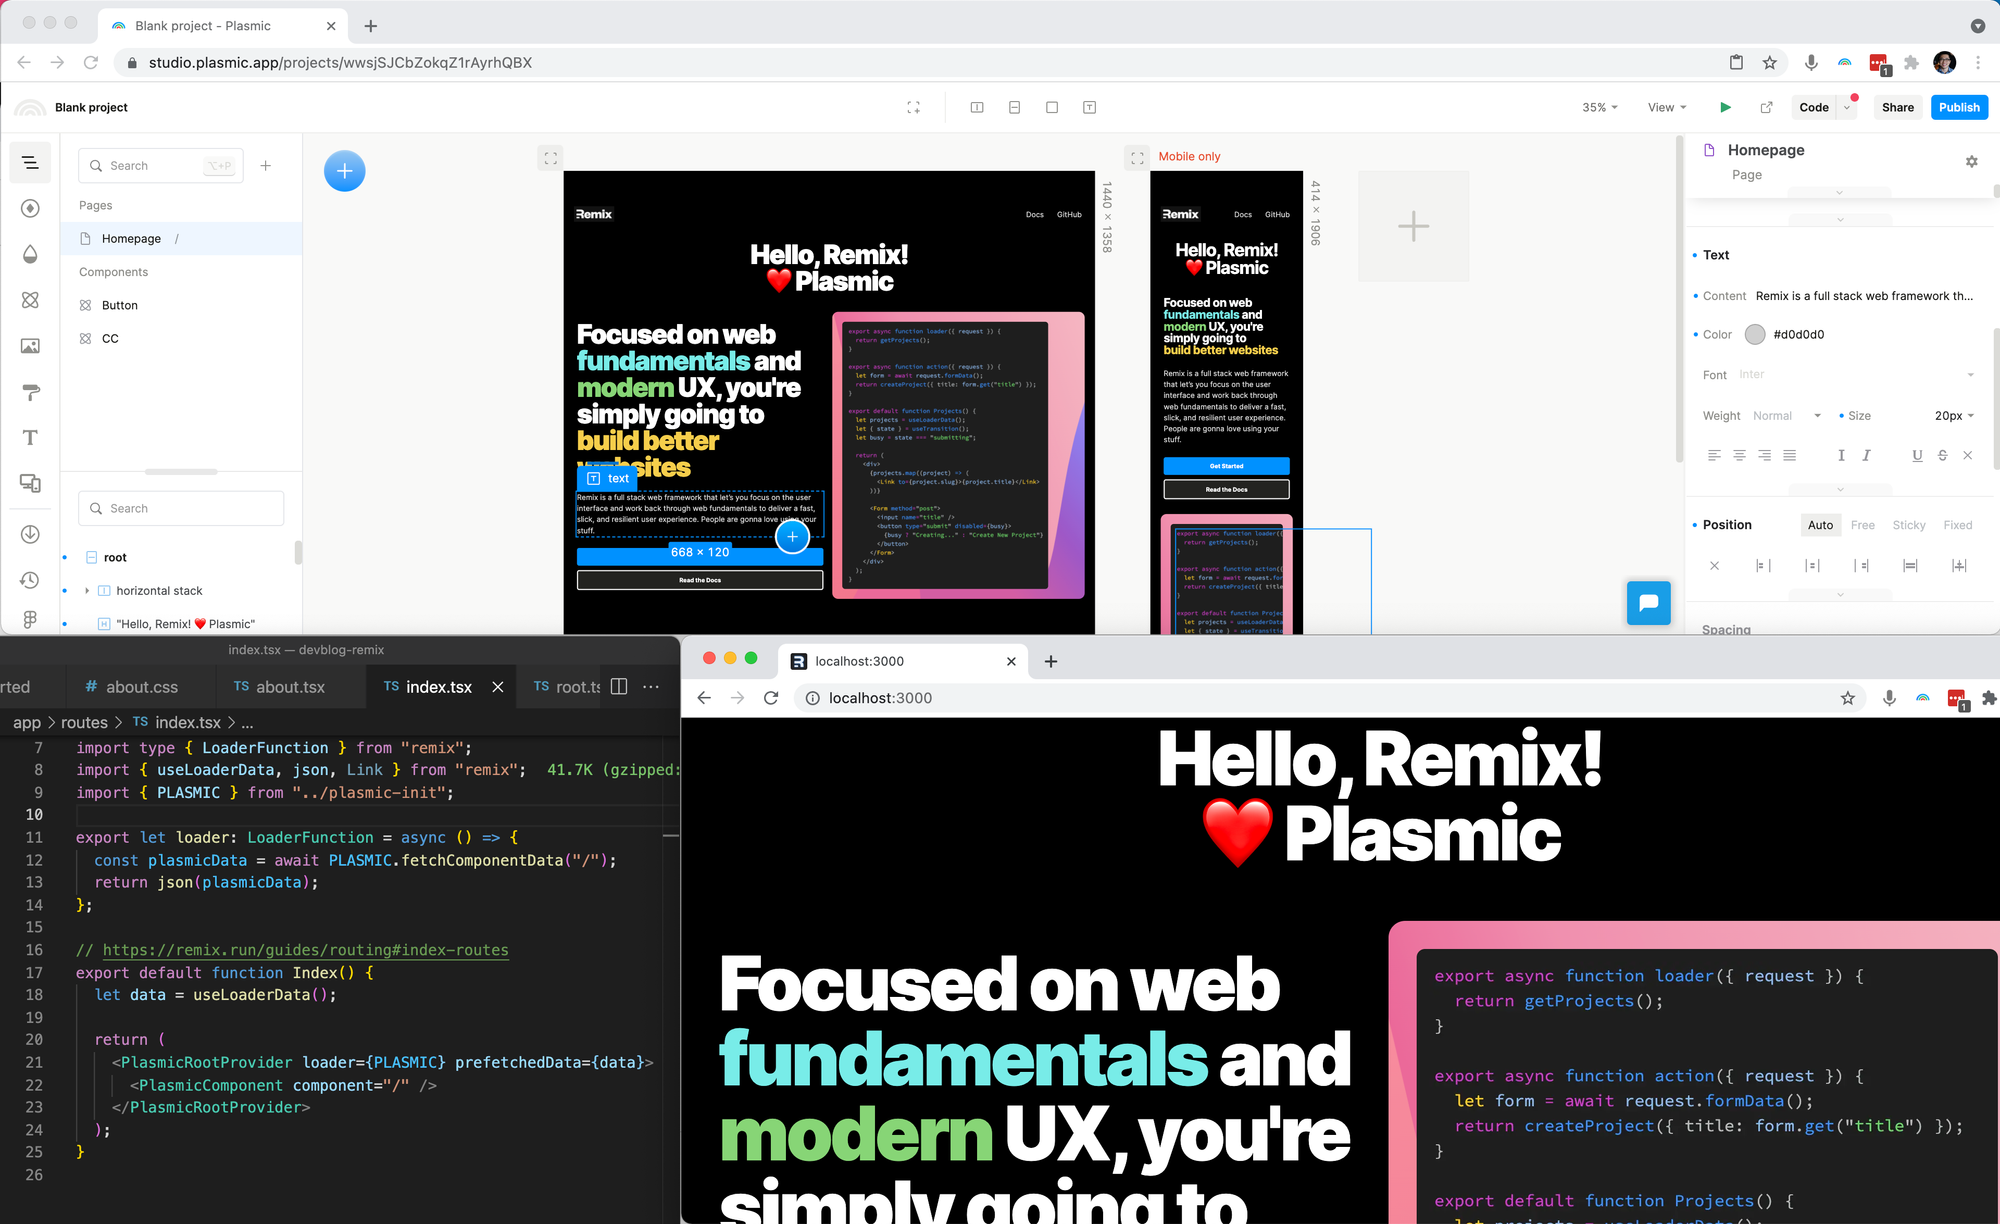
Remix is a full stack web framework that lets you focus on the user interface and work back through web fundamentals to deliver a fast, slick, and resilient user experience. People are gonna love using your stuff.
根据官网的一句话介绍,Remix 首先是一个基于 React 的全栈框架(类似 Next.js),让开发者可以更专注于用户体验。
记得去年4月份,Remix 还是一个商业付费的框架,主打 约定式路由,今年 10 月 12 号就给开源了,筹集到了 300 万美金用于后续发展。
三、优势(Benefits)
根据官网描述有以下几个优势:
- 🌈 前后端一体化设计:更加简单的前后端数据交互方式
- ☁ 部署到云原生基础设施:随着云原生基础设施逐渐成熟,Remix 可以运行在任何地方(Cloudflare Workers、Vercel 等)
- 🚀 页面加载不再有 loading、骨架屏,直接秒开
- ⪣ 嵌套路由:可以做到组件级别的动态加载
- ❌ 内置 ErrorBoundary:一个组件或请求出错,只会影响某一小块,而不是整个页面无法加载。
- 🧩 渐进增强:Web 应用运行时 JS 是可选的,可以在浏览器中禁用 JS 也能正常使用
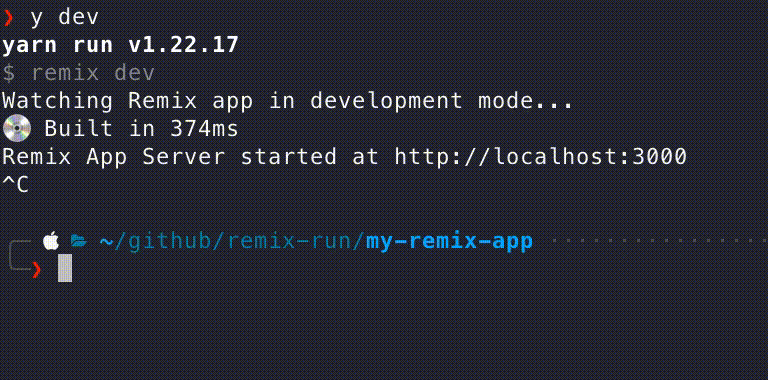
3.1 dev 启动快
毫秒级项目启动时间太吸引我了,得益于 esbuild 这个极速 bundler,带给开发者非常好的开发体验。
不同于 vite,esbuild 打出的包直接是 es5,不需要用到浏览器 ESM 特性,同时 Remix 可以做到浏览器端禁用 JS (Disabling JavaScript)也可以运行
3.2 前后一体化设计
看起来是在走 PHP、JSP 的老路,实际上改进了之前的 PHP/JSP 模板引擎渲染方式,以 React 为核心重塑了整个前后端开发模式。
项目目录结构大致如下:
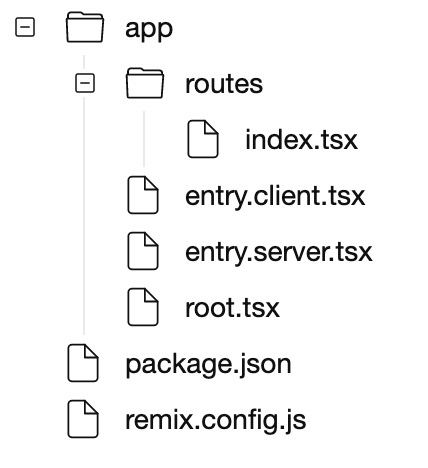
remix.config.js框架配置
entry.client.tsx前端入口
entry.server.tsx服务端入口
routes约定式路由,根据目录结构自动生成路由
除了入口文件外,前端代码与服务端(Node.js)代码可以同一个文件写,其中 React 路由组件中,可以导出函数钩子(大部分用于服务端),正因为这些钩子,让 React 组件有了超越 UI 的能力!
// app/routes/*.tsx

import { useLoaderData } from "remix";
import PostsView from "../PostsView";
import { prisma } from "../db";

// loader 中写 Node.js,可以使用文件系统、DB、...
export function loader() {
  return prisma.post.findMany();
}

// 改变 html 中的 <meta>
export function meta() {
  return { title: "Posts" };
}

// 一个组件
export default function Posts() {
  let posts = useLoaderData();   // 后面介绍
  return <PostsView posts={posts} />;
}
3.2 数据加载(Data Loading)
路由组件中,
function loader() 钩子方法写服务端代码(CURD),那么怎么将服务端的数据传到前端组件里呢?通过 Remix 导出的 useLoaderData hooks 方法进行串联。以一个首页组件为例:
// app/routes/index.tsx

import type { MetaFunction, LoaderFunction } from "remix";
import { useLoaderData, json, Link } from "remix";

type IndexData = {
  resources: Array<{ name: string; url: string }>;
  demos: Array<{ name: string; to: string }>;
};

export let loader: LoaderFunction = ({ request, context, params }) => {
  // 服务端数据
  let data: IndexData = {
    demos: [
      { to: 'demos/tree', name: 'Directory Structure' },
      { to: "demos/actions", name: "Actions" },
      { to: "demos/about", name: "Nested Routes, CSS loading/unloading" },
      { to: "demos/params", name: "URL Params and Error Boundaries" }
    ]
  };

  return json(data);
};


export default function Index() {
  let data = useLoaderData<IndexData>();

  return (
    <div className="remix__page">
      <aside>
        <h2>Demos In This App</h2>
        <ul>
          {data.demos.map(demo => (
            <li key={demo.to} className="remix__page__resource">
              <Link to={demo.to} prefetch="intent">
                {demo.name}
              </Link>
            </li>
          ))}
        </ul>
      </aside>
    </div>
  );
}
首次访问页面时,直接走服务端渲染,Network 里是没有
fetch 请求的,但前端路由切换时会走发请求,也许会好奇,代码里并没有写请求地址,数据请求的 url 是什么呢?# 首次访问页面 $ curl -I http://localhost:3000/demos/tree Content-Type: text/html; charset=utf-8 # 前端路由切换 $ curl -I http://localhost:3000/demos/tree?_data=routes%2Fdemos%2Ftree Content-Type: application/json; charset=utf-8
我们发现,路由组件的
loader 钩子和前端路由的 pathname 是对应的,通过 ?_data=loader文件路径 来区分是 数据 还是 页面,不得不说这个设计非常精巧。3.3 表单提交(Data Writes)
Web 应用除了读数据外,更多的是写数据,以常见的表单提交,来看下 Remix 是如何处理的?
说起表单,在 SPA 单页应用中,我们写一个表单提交,会管理大量表单状态(提交中、表单错误、表单值等):
常规做法是:
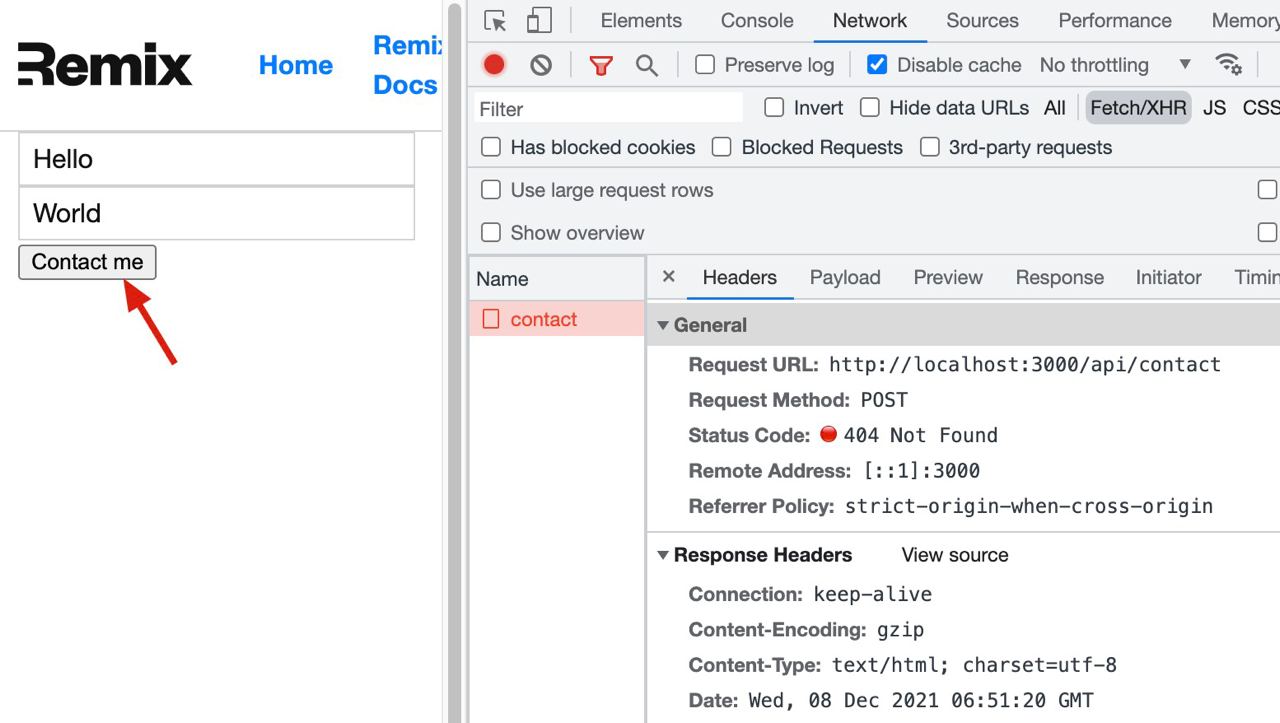
export default function ContactForm() {
  const [name, setName] = useState(null)
  const [email, setEmail] = useState(null)
  const [submitting, setSubmitting] = useState(false)
  const [errors, setErrors] = useState(null)

  return (
    <form onSubmit={handleSubmit}>
      <input type="text" name="name" />
      {errors?.name && <em>Name is required</em>}
      <input type="text" name="email" />
      {errors?.email && <em>Email is required</em>}
      <button type="submit">Contact me</button>
    </form>
  )
  async function handleSubmit(e) {
    e.preventDefault()

    const formData = { name, email }

    if (errors) {
      setErrors(errors)
    } else {
      setSubmitting(true)
      try {
        // Communicate with the server.
        const response = await fetch('/api/contact', {
          method: 'POST',
          body: JSON.stringify({
            contact: {
              ...formData,
            },
          }),
        })
        const result = response.json()
        if (result.errors) {
          setErrors(result.errors)
        } else {
          // Reset the form state...
          setName(null)
          setEmail(null)
        }
      } finally {
        setSubmitting(false)
      }
    }
  }
}
这种做法并没太大问题,只是比较繁琐而已。同样的表单提交功能,Remix 实现则非常简洁:
import { useActionData, redirect } from 'remix';
import type { ActionFunction } from 'remix';

export let action: ActionFunction = async ({ request }) => {
  let formData = await request.formData()
  console.log('formData', formData);

  let name = formData.get('name')
  let email = formData.get('email')

  let errors = {}
  if (!name) errors.name = true
  if (!email) errors.email = true

  if (Object.keys(errors).length > 0) {
    return errors
  }

  // await createContactRequest({ name, email })

  return redirect('/')
}

export default function ContactPage() {
  let errors = useActionData()

  return (
    <form method="post">
      <input type="text" name="name" />
      {errors?.name && <em>Name is required</em>}
      <input type="text" name="email" />
      {errors?.email && <em>Email is required</em>}
      <button type="submit">Contact me</button>
    </form>
  )
}
提交表单后,实际上也是发了一个请求,只不过和 Data Loading 一样,请求的地址依旧是前端路由的
pathname,只是用 POST 请求向服务器提交后,刷新页面# 访问页面 $ curl -I http://localhost:3000/demos/remix-form Content-Type: text/html; charset=utf-8 # 提交表单 $ curl -I -X POST http://localhost:3000/demos/remix-form --data-raw 'name=name&email=email' Content-Type: text/html; charset=utf-8
这种处理实际上是简化前端 UI 逻辑,更多使用 Web 标准,将数据处理的工作交由后端,前端专注于用户体验,而不是表单验证的逻辑前后端重复实现(例如:邮箱格式校验、身份证号校验,前端整一套,服务端再整一套,真是难受😭)
3.4 细节处理
更多功能可以见官方文档,对 Remix 优势这块最后再聊下一些细节处理,毕竟细微之处见真章。
3.4.1 内置绝对路径别名 ~
为了不让开发者写出这样的相对模块引用
- app
	- routes
		- demos
			- index.tsx
	- styles
		- index.css(被引用)

// app/routes/demos/index.tsx
import styles from "../../styles/index.css"; // 🤯
Remix 框架默认配置了
~ 路径前缀做绝对路径引用import styles from "~/styles/index.css";
3.4.2 React 类型全局引入
可直接使用全局 React 类型,不需要再
import type { FC, ... } from 'react'// import React from 'react'; (不需要) const Application: React.FC<{}> = () => {}
3.4.3 服务端适配器(Server Adapters)
Remix 为了实现 run anywhere(到处运行)的目标,打包出来的产物
build 不与具体 Node.js 框架绑定/耦合,提供 @remix-run/{adapter} 包在上层扩展部署模式// server const { createRequestHandler } = require("@remix-run/{adapter}"); // express const { createRequestHandler } = require("@remix-run/express"); // vercel const { createRequestHandler } = require("@remix-run/vercel"); // ... createRequestHandler({ build, getLoadContext });
第一眼看 Remix,觉得和 Next.js 很像(至少在目标上是一致的),仔细一对比有些区别:
- 工具链更激进:Remix 彻底放弃了 babel、webpack,直接改用 esbuild。
- 部署产物更激进:Remix 早期不支持部署纯前端到 CDN,只要支持 V8 运行时就可以(CDN 边缘计算、Cloudflare Workers 等)
- 更靠近 Web 标准,自然对用户体验更好,尤其是在无障碍访问(Accessibility)领域
四、思考(Ideas)
这里抛砖引玉,聊下自己对未来 Web 开发的看法:
大趋势
- 云原生时代下,以及边缘计算逐渐完善,Web 应用(Node.js、Rust、Golang 等)可以部署到 CDN 上(例如 Cloudflare Workers)
- 前后端一体,社区现在倾向于将前后端放一起,模糊界限(此处应有 『PHP 是世界上最*的语言』 ),有点像 BFF + 前端,让前端开发承担更多的开发责任,做更多的事。这样看 faas 不仅限于提供 API,同样可以渲染出一个服务端组件(如 React Server Components)
- 更重视 UX,开发者体验得到了更多重视,比如强类型、启动时间、错误信息、编译器检查(rustc)等
结合 Remix 开发产品
以博客系统为例,里面有写文章、三方 SSO 登录、评论功能。
- 首先在 Remix Loaders 市场(未来可能有,类似 BaaS 市场,里面封装好可复用的服务端功能),选 SSO 登录、评论、数据库的 loader
- 本地 / 云端 FaaS 使用 Remix 进行全栈开发,功能最先开发完
import { ssoLogin, comment, db } from '@remix-run/loaders';

const { Comment } = comment;

export const loader = async (ctx) => {
	const user = await ssoLogin(ctx);
	await db.User.create(user);

  // React Server Component
	comment.register(ctx)

  return user;
}

export default () => {
	 const user = useLoaderData<ssoLogin.User>();
   return (
		 <>
       <p>尊贵的 {user.username},您好!</p>
	     <Comment />
     </>
   )
};
- 优化功能界面,这是个细节活,让应用达到更好的用户体验
- 一键部署或一行命令,自动发布到测试环境,验证成功后,推送到边缘计算 CDN 上,不用再根据预估 QPS 要计算资源了,自动扩缩容。
- 用户访问性能监控,持续改进优化用户体验